Sorry, can't help but write that title. But this is truly a quick-cook sopas recipe! Effortless, flavorful, tasty, yummy, warm and tummy-filling! This is a family-original recipe. It was actually Hubby who thought of the ingredients first. Though he does not cook much, he always comes out with creative ideas on how to use different ingredients, and putting them together to produce something new. He is also quite creative with the left-overs.
My kids love sopas. They eat bowlfuls of it for lunch or dinner. In our family, sopas is not merely a soup or side dish, it is the main course by itself! I would usually boil some chicken pieces, debone and flake the meat, then use the stock to cook the macaroni. Healthy but time-consuming.
One day, when we were eating dimsum in a chinese restaurant, we were commenting on how flavorful the goto (beef tripe) was. Bingo! Hubby ordered 2 more servings for take home. He then proceeded to give me instructions on how to use the already cooked-beef tripe dimsum to make sopas. We tried it at home and it was successful!
This recipe is so easy to make because it already uses some pre-cooked ingredients. Ideal for those busy nights when you come home late from appointments or other commitments. Whenever we do not have much time for cooking, we would just pass by any chinese restaurants that offers dimsum, then, go back home to make this sopas. We also tried using the beef litid(ligaments) dimsum and the soup turned out more flavorful and thick.
We would usually add chopped spring onions. But there was none in this picture because this picture was taken from Daughter's bowl. She does not eat green onions.
3 servings beef tripe or beef litid
1 pack (500 gms) elbow or shell macaroni
6 C water
salt and pepper to taste
1/2 C milk (I usually use fresh milk, but evaporated milk can be used)
chopped green onions
1. Pour water in a big pan. Add the beef tripe or beef litid, including the meat juices or sauce. Bring to boil. You may want to cut the pre-cooked meat into smaller pieces to release more flavor. Simmer for at least 10 min.
2. Add the macaroni. Cook for 10 min or until al dente. Season to taste.
3. Pour in the milk, and bring to near-boil. I usually do not let the milk boil because it will cause curdles at the side of the pan and the consistency of the soup changes.
4. Laddle into soup bowls and sprinkle with lots of chopped green onions.
5. Serve piping hot!
Easy, isn't it?
Thursday, January 31, 2008
Tuesday, January 29, 2008
Chocolate Cake
I was intrigued by this cake recipe from the Food magazine. It seems quite simple and easy to make. It does not use eggs nor butter but uses mayonnaise instead. Accordingly, the mayonnaise will make the cake extra moist and delicious. But is it healthier ?
Admittedly, it is easier to do, with less ingredients to mix. It does not need the electric mixer, therefore, one less equipment to clean. So, I tried it and brought it to the Couples@Work Fellowship for the taste test. Wow! Everybody enjoyed it! The taste is chocolately because I used Dutch-processed cococa powder. I also sprinkled some mini-chocolate chips for decoration. Though it was not as moist as I expected ( Maybe I overbaked it? I should lessen the baking time the next time around.)
1 C sugar
1/4 C Cocoa powder
2 t Baking Soda
1 C Mayonnaise
2 C sifted all-purpose flour
1/2 C water
1/2 C milk ( I used fresh milk)
1 t vanilla extract
1. Preheat oven to 350 F. Grease an 8" x 13" baking pan. Set aside.
2. In a bowl, combine sugar, cocoa powder, baking soda and mayonnaise. Mix well.
3. Add flour, water, milk, and vanilla extract. Stir to blend. Pour into prepared pan.
4. Sprinkle top with mini-chocolate chips, if preferred. Bake for about 40 minutes or until cake tester inserted in the center comes out clean. Let cool on wire rack before serving.
Monday, January 28, 2008
Golden Banana Cake
Does this Banana Cake look yummy? You know? It is even more delicious than it looks. Daughter declared it is the best Banana Cake she has ever tasted! Actually, I got this recipe from Market Manila's website. He in turn, got it from Francois Payard's Sensational Desserts Book. Market Man gave this recipe a stunning review, to quote, "It was moist, light, highly flavorful and aromatic and not excessively sweet. It did not rely on vanilla to add taste and it satisfied even the strongest craving for banana cake."
With a review like that, of course I was tempted to try out the recipe! And yes, it turned out to be sensational!
1 C all-purpose flour
1/8 t baking powder
pinch of baking soda
4 large eggs
1/2 C unsalted butter
1.5 T olive oil
3/4 C sugar ( I used brown sugar)
1.5 ripe lacatan bananas, peeled and mashed (Actually, I used Cavendish Bananas)
1. Preheat oven to 325 F. Grease an 8" or 9" loaf pan with butter and sprinkle with flour, removing excess flour.
2. Sift together flour, baking powder and baking soda. In a mixing bowl with electric mixer, mix butter, olive oil and sugar at low speed. Add 1 egg at a time and beat at higher speed until fully mixed.
3. Add mashed banana. Add flour mixture and stop soon after. Do not overbeat.
4. Scrape the batter into prepared pan and put in the preheated oven.
5. Bake for about 40 to 50 min until a toothpick inserted in the center of the cake comes out clean. Cool before serving.
Thursday, January 24, 2008
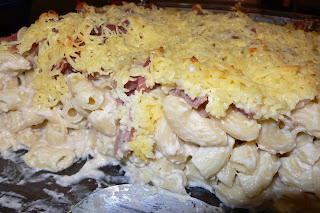
Baked Cheesy Carbonara Macaroni
Last week, daughter asked for Macaroni and Cheese. Why did she think of that? She had read from the Baby Blues cartoon strip that Wanda (the mother of the babies in the strip) makes Macaroni and Cheese three times a week. Accordingly, the children and parents in the strip have lesser food fights if the children are served Macaroni and Cheese because they - the children are too picky with their food. Daughter thought that Macaroni and Cheese must then be good if the babies prefer Macaroni and Cheese over anything else. (Even if the source of this opinion is only a cartoon strip. What if Wanda turns out to be not a good cook?) Well, anyway, we have not done Macaroni and Cheese yet. We have done all kinds of pasta, the regular Putanesca Spaghetti, Pesto Linguini, Baked Macaroni (red sauce) and Baked Lasagna (which was inspired by Garfield, but it will get its turn) but we have not done the regular American staple.
I was thinking how bland it would be if I just used cheese and cream sauce. So, I tried using Cream of Mushroom Soup to make the cream base more flavorful. Then I added chopped ham (we still have some Christmas ham left!) and sauted it with garlic and onions. The result is something like Baked Carbonara but very cheesy. The kids loved it of course. But hubby said it does not look healthy. Do you agree?
Here's my version of Macaroni and Cheese. Enjoy!
1 (500gm) pack macaroni elbows, cooked according to package directions
2 cloves chopped garlic
1 onion, chopped
3 slices Christmas ham, chopped
3 T butter
1 can Cream of Mushroom Soup (I used Campbell brand)
2 C milk
2 C cheddar cheese, grated
1. Melt butter in a pan. Saute the garlic and onions for a while. Add the chopped ham.
2. When ham is cooked, add the Cream of Mushroom Soup and milk. Stir the mixture until all the soup is dispersed in the liquid. Turn off heat after the sauce boils and the consistency is smooth.
3. Put in 1 cup of the grated cheddar cheese into the mixture. Mix everything. Toss in the cooked macaroni pasta. Gently stir to coat all the macaroni.
4. Pour into a baking dish ( I used 13 x 9). Sprinkle the rest of the cheese on top of the macaroni.
5. Bake at 350 F until cheese melts or turns golden.
Tuesday, January 22, 2008
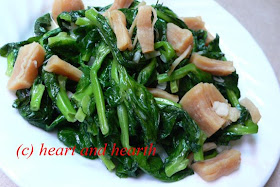
Dou Miao with Dried Scallop Stir Fry
Look what hubby brought home from Hong Kong!
These tender snow pea shoots are always a family favorite. They look a little bit like spinach leaves. Only smalller, and the texture is different. We only get to taste it once a year when hubby would come back home from the annual Hong Kong Fashion Convention. This variety is seasonal - that is, it is only available in winter. It is different from the Tou Miao that we have here. What we have locally is this:
This looks more like the monggo bean sprouts, but tastes better than the monggo bean sprouts. This local variety is not bad, if you get the tender ones. But the snow pea shoots are a real treat! I think it is considered a delicacy in Hong Kong and China. Hubby said it is selling triple the price of brocolli. And so in honor of this once a year special delicacy, I sauted it with dried scallops, and with lots and lots of garlic.
1 bunch Dow Miao, washed (it is probably half-pound)
1/4 c cooking oil
1/4 c garlic, chopped (you can add or subtract depending on your taste)
2 slices ginger
1/4 c dried scallops, pre-soaked, softened, reserve the liquid
salt and pepper to taste
1. Heat up the cooking oil in a big wok. Saute the ginger slices. Wait for the ginger to turn golden before adding the garlic.
2. Saute garlic for a while. I do not wait for the garlic to brown. I prefer them half-cooked. Add the pre-soaked and softened dried scallops.
3. Wait for the wok to be really hot before adding the Dow Miao. Mix well, continue blending the leaves with the oil and scallops. Add the reserved scallop liquid if too dry.
4. Add salt and pepper to taste. Dish up when the vegetables are cooked.
Serve hot.
Monday, January 21, 2008
Chicken Bicol Express
A few weeks back, hubby brought home Bicol Express from his office canteen. It is a canteen version with pork and pork fat, thin cococut milk and chiles. A bit on the bland but hot side. He wanted me cook something like it and improve it. My maid then suggested: what if we use chicken meat? hmmm... sounds good. It would be a healthier too. You know? I really thank God for my trusty helper. Of course she has her quirks some times. But she is creative when it comes to the kitchen. Not only can she cook, she can improvise and make do with whatever ingredients we have on hand.
I included chicken in my grocery list last week and we had this last night. The first picture above taken for food styling. Do I get a passing grade for that?
I was thinking of adding malunggay leaves but there was none in the grocery that day. however, there were bunches of nice kangkong leaves which I think would blend very well with the bagoong (fish paste). Here's my version of Bicol Express using chicken meat. Enjoy!
1 and 1/2 K Chicken pieces, cleaned ( I used drumsticks, but you can use any of your favorite cuts.)
3 slices ginger
3 cloves garlic, mashed
3 T bagoong or fish paste (I used the bottled chinese bagoong)
3 tomatoes, sliced
2 pcs finger chiles or siling haba, sliced (this is how much my family can tolerate. you can add more if preferred)
1 can coconut milk
1 bunch kangkong leaves, cleaned, stems and leaves separated
3 T cooking oil
salt and pepper to taste
sugar to taste
1. Wash and dry the chicken pieces well. Slice the ginger, chop the garlic. Slice the tomatoes. Wash kangkong leaves well.
2. Saute ginger in oil. Add the garlic when ginger turns a bit golden brown. I usually wait for the ginger to turn a little bit golden before adding the garlic. This brings out the full ginger flavor.
3. Add the chicken pieces. Stir well, until chicken changes color. Add the tomatoes and fish paste. Mix well again. Add the chiles.
4. Add the coconut milk. Bring to boil then simmer until chicken meat is fully cooked and soft, around 15 minutes. If using freshly squeezed coconut (gata), you can add the liquid from the second squeeze (pangalawang piga) at the beginning, then add pure liquid from the first squeeze (the kakang gata) when the chicken is cooked.
5. Add the cleaned and chopped kangkong leaves. Boil again. Season to taste.
Serve hot.
If you will notice the picture, the chicken pieces have no skin. Yup! That's right. We remove the chicken skin before cooking. Primarily for health reasons - chicken skin is full of cholesterol. I suggest you should too.
Quick Fruit and Nut Bread
This is the first bread that I made and I am so pleased it turned out to be like the pretty picture in the glossy Food magazine! See!?!
One day, I was browsing through my old issues of the Food magazine and I came across this topic about making Quick Breads. Accordingly, these quick breads are easy to make They rise with the help of baking powder and baking soda and they do not have to undergo the long fermentation process needed when making yeast-based breads. This seems to be the perfect way to make breads for people like me who do not really look forward to kneading doughs, waiting for them to rise, punching down the doughs and all those other long tedious preparations called for by yeast-based breads.
I was also looking forward to filling my house the smell of freshly baked bread from my kitchen! Wouldn't it be nice to surprise hubby when he comes home from work?
Since I was so excited to bake one immediately, I had to make some recipe substitution again and used what i have in my pantry. The original recipe called for walnuts. I substituted with roasted cashew nuts. The original recipe asked for dates, and I only had sultanas.
Does the finished product taste as good as it looks? Well, it tastes like bread! Yummy when eaten warm with a (thin) slab of butter. One thing though, since we did not use yeast, this bread is not as fluffy and soft as pan de sal and other yeast-based breads. But still, it is worth baking your own quick bread since it is quite an easy process, and you will be sure you family will be eating fresh, clean, quality breads free fom preservatives and additives.
2 C all-purpose flour
1/3 C brown sugar
2 t baking powder
3/4 t salt
1/2 t nutmeg or cinnamon, optional ( I used cinnamon)
1 egg
1 C milk
3 T melted butter, cooled
1/2 C Coarsely chopped walnuts ( I substituted Cashew nuts)
1/2 C Dates ( I substituted sultanas raisins)
1. Preheat oven to 350 F. Grease an 8" x 4" or similar size loaf pan. On a large bowl, sift together flour, sugar, baking powder, salt, nutmeg or cinnamon. Set aside.
2. In a small bowl, beat egg until lemon-colored. Add milk and melted butter. Beat until well-combined.
3. Stir liquid mixture into the flour mixture. Blend until well mixed. Fold in nuts and raisins. Place dough in loaf pan and bake for about 30 minutes or until to is golden.
Tuesday, January 15, 2008
Reader Response
One of our readers said that Chilean Sea Bass is also available at S & R Membership Shopping. Thanks for the tip, Friend!
I also read in the Yummy Magazine that S & R also carries Wagyu Beef. Wow! If only for these two items, S & R is worth another visit again.
Monday, January 14, 2008
Shrimp Stuffed Portobello Mushrooms
Hubby brought home one pound of fresh portobello mushrooms the other day. Fresh mushrooms do not have long storage life. Since I could not turn every cap into soup, I had to research fast on how to cook this tasty mushrooms in other ways.
A quick search on the internet showed mostly grilled recipes. Perhaps this is the best way for the full flavors of the mushrooms to come out. However, I was looking for something more. I came across this baked recipe which I altered a little. The recipe called for fresh rosemary, which I do not have on hand, so, i used fresh basil instead. I lessened the mayonnaise, for a healthier version. (The original version asked for half-cup!) I did not saute all the ingredients for stuffing. And because I was in a hurry, I did not use the conventional oven which would require pre-heating. I just used the oven toaster instead. Inspite of all the changes I made, the results came out very tasty and yummy! Wow! a great tasting dish that is easy to make! This is the new family favorite now.
1/2 C Chopped onion
1/4 C Chopped fresh basil
3 cloves chopped garlic
1/4 K Shrimps, de-shelled, deveined, chopped coarsely
1/2 C Japanese bread crmbs
1/4 C Grated Parmesan Cheese
2 T Mayonnaise
salt and pepper
olive oil for brushing
1/4 C Mozarella cheese
10 caps Portobello Mushrooms, stems & dark gils removed
1. Wash and pat dry the Portobello mushrooms. Remove stems and the dark gills. You can use the stems and the gills for soup. Set aside.
2. Mix together the onion, basil, garlic, shrimps, bread crumbs, parmesan cheese and mayonnaise in a bowl. Season to taste with salt and pepper.
3. Coat the tray for the oven toater with olive oil. Arrange the mushrooms, rounded side down on the oiled tray. Mound shrimp filling in the mushrooms, pressing filling to compact slightly.
4. Bake in the oven toaster at its highest setting for 15 minutes, or until the shrimps turns pink and are thouroughly cooked. Take out the tray. Sprinkle mozarella cheese on top of each shrimp stuffed mushrooms. Bake for additional 3 to 5 minutes or until the cheese melts.
5. Serve immediately.
Cream of Portobello Mushroom Soup
Hubby and I fell in love with fresh Portobello Mushrooms when we first tasted this Cream of Mushroom Soup served in a quaint eatery in Auckland, New Zealand. It was seved warm against the cold chilly winds of Auckland. It was comforting. It was fresh. It was creamy and filling. Hmmmm...
Again, I was pleasantly surprised to find fresh portobello mushrooms available at Santi's Deli. (They have it newly delivered on Thursdays.) I tried recreating the soup at home with wonderful results. I feel that these tasty mushrooms can stand by its own flavor. I just added some celery for color and for the texture.
3 caps fresh Portobello Mushrooms
2 stalks celery
3 T butter
4 cloves garlic, chopped finely
1 whole onion, chopped finely
4 C chicken soup stock
salt & pepper
2T flour and 2 T cornstarch dispersed in water
1/2 C fresh milk or all-purpose cream
1. Chop Portobello mushrooms and celery very finely. I prefer my soup to still have some texture, so I just chop them, even if this is time consuming. If you prefer your soup to be fine, then you can use blender or food processor for this step.
2. Melt butter in a soup pot. Saute garlic and onions briefly. Add in the chopped portobello mushrooms and saute briefly. Add the chicken stock. Bring to a full boil then simmer for 20 minutes.
3. Add the chopped celery. I add this just before finishing cooking the soup because I want my soup to have texture. But if you want it cooked and soft, you should add celery with the mushrooms.
4. When the soup boils again, add the flour/cornstarch diluted in water to thicken the soup. Mix thoroughly and let boil again.
5. Add milk or cream last. Season with salt and pepper to taste. Serve immediately.
Choose fresh mushrooms that are whole, firm and not soggy wet. They're better cooked right after purchase as they do not keep well in the refrigerator.
Wednesday, January 9, 2008
Grilled Chilean Sea Bass
The first time hubby and I tasted Sea Bass was in a posh wedding banquet of one of Manila's elite couples many years ago. We were served this succulent, flaky, melt-in-the-mouth Pan-Seared Sea Bass. It was simply cooked. There was no overpowering sauce. The flavor really comes from the fish. Since then, whenever we have the chance to go out for "fine-dining," I would order this fish. Needless to say, this imported fish is quite expensive. It costs more than five hundred pesos per order and we would be served only a small portion.
I was very happy to discover than Santi's Deli carries Sea Bass (as well as Angus Beef, but that will be another story.) It is still quite expensive, compared to our local fish. One uncooked fillet, around 8 inches diameter and 2 inches thick would already cost more than two hundred pesos. But that is equivalent to two restaurant-servings already. So, in a way, buying the fish from Santi's and cooking it at home is still cheaper than eating it in the restaurants.
If you wish to have fine-dining at home, without the "fine-dining" price, Grillled Chilean Sea Bass is the way to go. It is easy to cook. It is healthy and you will really enjoy the succulent melt-in-the-mouth taste. Just pair it with a light Salad, a Creamed Soup, a glass of white white, you will truly have that "fine-dining" experience.
1 Chilean Sea Bass fillet
freshly ground salt
freshly ground black pepper
ground cayenne pepper (optional, for those who want it a little spicy)
dried dill leaves (also available at Santis)
4 T Olive oil
1. Wash and pat dry the fish fillet well. (Do not remove the skin at this point yet).
2. Sprinkle the seasonings on both sides of the fillet. Leave for at least 30 minutes.
3. Drizzle Olive oil all over the fish. Make sure all surface are covered or the meat might stick to the grill.
4. Grill over medium heat until meat is cooked. Remove skin before serving. Serve immediately.
I use stove-top grill which is convenient for me. It also produces that charred grill lines we like to see in our grilled foods but without the carbon residue from coals.
Actually, I do not know why it is called Chilean Sea Bass in this country. I am not sure if it is really of a different variety from the regular Sea Bass or if it is just a label the local dining scene added for the 'hype' to make it more elite, and therefore more expensive. What I do know is that Sea Bass does not neccessarily come from Chile. In countries like Europe and America, they prefer their Sea Bass caught in the sea. Just like the Salmon, the farmed variety of Sea Bass contains more mercury than the ocean-caught ones. But then, here in our country, we can never really be sure about the source of our imported fish. So, maybe it is still better to go local.
Monday, January 7, 2008
Ham Omelette
Hubby and I usually enjoy heavy breakfasts as we believe this would jump-start our day with enough energy needed for our everyday tasks. We received a lot of hams this holiday season. (Thank you very much to all our friends and families who shared the blessings of the season with us.) So, I thought of making Ham Omelet.
This Omelette recipe is very versatile. You can add any topping you want. Sometimes, I would just add sliced olives, chopped mushrooms and sliced bell pepper for a healthy vegetable omelette. Sometimes, I would use the left-over chicken or pork from the previous night dinner. For a real treat, I would stir fry some de-shelled shrimps in garlic and olive oil and use this as topping. I usually use grated mozarella cheese in my omelette as this would melt and provide a nice chewy texture. But I think the regular grated cheddar cheese would do as well. Enjoy!
Omelette
2 eggs
2 T cream (but I usually use fresh milk)
1 T chopped garlic
2 T sliced onion
2 T diced bell peppers
3 T sliced button mushrooms
4 T diced tomatoes
4 T grated mozarella cheese
4 T diced cooked ham (substitute with cooked shrimps,or chicken or pork)
salt and pepper
1. In a bowl, whip eggs with fork. Add the cream or milk. This gives eggs a fluffy mixture. You can omit this if you want less calories. Season with salt and pepper. Please take note that cooked ham is already salty, so you might want to lessen the salt in this case. Continue whipping until well blended.
2. Pour egg mixture into a warm non-stick skillet. You can put a little oil first to prevent sticking. Spread the egg mixture evenly over the pan, lower the heat and maintain low heat throughout cooking.
3. Spread the ham over egg mixture, then all the rest of the ingredients, with mozarella cheese last. Cook slowly until eggs are set.
4. Fold egg over, serve warm, topped with grated cheese, if desired.
This omelette is quite versatile because you can use whatever topping ingredients you prefer, and in any amount you prefer. My listing of the ingredients above is just an estimate. For example, you do not particularly like garlic, then you may lessen the amount or totally omit it. Or if you prefer more tomatoes, then simply add more. If I am making an omelette for hubby, I have to put in more mushrooms. But for the kids, I have to totally omit the mushrooms. This recipe is also a good way to recycle the left-overs.
Update: August 27, 2008
I think Omelette spelled with the "tte" at the end is the French spelling. That is how I usually spell Omelette, until the google spell-checker suggested "Omelet" without the additional "tte." Since we are writing in English, maybe I should stick to the "Omelet"... but I don't know, "Omelette" sounds more sophisticated, doesn't it? :)
This updated post is my entry to the First 101 Recipe Series featuring Omelets. To join this foodie event, please check out Sangeeth's Art of Indian Cooking. You will definitely learn a lot from this blog!